In my last post I discussed why I’m learning the COLEMAK alternative keyboard layout. Now I wanted to talk a bit about how I’m going about it.
A minute to learn, a lifetime to master, goes the tagline for the popular board game Othello (or Reversi if you’re on the other side of the Atlantic). The same principle applies to learning a new keyboard layout. Okay, it takes a bit more than a minute to learn where the keys are, but if we’re being pedantic it takes a little bit more than a minute to learn how to play Reversi, too.
Memorising the locations of 26 letters on the COLEMAK layout, only 17 of which are in different positions to a QWERTY keyboard, is a trivial exercise. The hard work is making your fingers hit them. After thirty years of ‘standard’ layout, every keypress is a battle of mind over matter as my brain tries to direct each finger to where it should go rather than where it naturally wants to go.
Except of course, there is nothing natural about typing; it’s a learned behaviour, and what has been learned can be un-learned.
Learning a new layout then, is about re-training muscle memory. The only effective way of doing that is practice. There are a number of ways that practice can be done.
- Go ‘cold turkey’. Many people will claim this is the only true way to learn. Out with the old, in with the new. Chuck away QWERTY, never to be touched again. A clean break. Advantages: Forces you to learn; imposes practice because everything you type is effectively practice. Disadvantages: Typing speed will be painfully slow initially, and error rate horribly high, so production levels will suffer enormously; temptation to give up is high.
- Use an intermediate layout. This might not be possible with the more popular DVORAK keyboard, but with COLEMAK there are a set of halfway-house transitional layouts called TARMAK, which progressively change four, then seven, then ten, then fourteen keys, allowing you adjust to from QWERTY to COLEMAK slowly over time. Advantages: Gain the enforced practice of going cold-turkey without taking such a big productivity hit. Disadvantages: The transitional layouts are not natively supported by any major operating system, so additional software is required; the overall time to learn can be longer because you are stretching the process.
- Learn the new layout outside of working hours. In this scenario, the classic keyboard is used for the day job, and the new one is practiced away from work. Advantages: Relatively little hit to productivity (I say ‘relatively’ because there can definitely be a hit when switching back and forth between two keyboard layouts — it confuses the brain). Disadvantages: Requires extra time outside normal working hours; time to learn can be longer as the old muscle memory is still getting used and reinforced.
That last point was the reason why, as I embarked on my mission to learn COLEMAK, I decided to go cold-turkey as quickly as possible. If I write for say, four hours a day using the classic layout, then spend an hour or two practicing the new one, my muscle memory is obviously getting more of a workout in the layout I’m trying to move away from than the one I’m trying to learn. Definitely sub-optimal.
On the other hand, going cold turkey and facing a roughly tenfold drop in typing speed is also far from optimal.
Which is why I started with option 3 for the learning phase, and only switched to option 1 when I had a reasonable grasp of the layout.
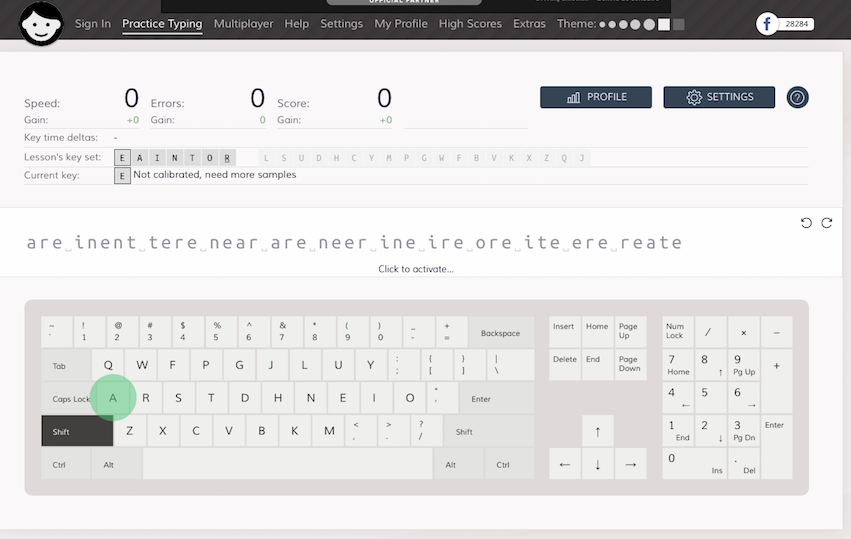
 My tool of choice for the learning phase was a website called keybr.com. It has some nice features which made it stand out in a competitive space:
- It’s browser based (and not Flash), so accessible from whatever computer happens to be handy at the time, including my beloved iPad.
- It supports a wide selection of keyboard layouts, including of course, COLEMAK.
- Layouts can be simulated on the site, so you can practise one without changing the layout on your computer. It sounds like a trivial thing, but it makes it so easy to pop into the browser, bash through a few exercises, and jump out again without having to worry about messing around with system settings. It also means all your shortcut keys work as normal because only the text you’re typing into the exercises is deemed to be in the alternative layout.
- Automatically generated exercises direct your practise where you need it.
It’s those automatic exercises that make keybr.com so splendid. You start off learning just a few letters, all on the home row. You’re given a line of text to type using only those letters. The words are all made up, which is odd at first, but you quickly get used to it. Because the system creates these nonsense words, it can generate sequences with an unusually high proportion of common letter combinations, so you get used to hitting those sequences of keys in quick succession.
Sidenote: COLEMAK is very good at making common combinations and digraphs easy to type. The layout encourages inward finger rolls, which are a natural and fast movement. Examples of inward-rolling digraphs include: ie, st, oi, ar, ul, and at.
The site monitors your progress, keeping track of speed and accuracy for every key. As you get faster and more accurate, your ‘confidence score’ for each key increases. Make too many mistakes or go too slowly and it drops. When your score for all the letters you are learning is high enough, the system throws in a new letter. It’s like unlocking an achievement in a video game.
The letters are introduced in roughly the order in which they most commonly occur in the English language, with preference given to the home row (and in COLEMAK, the home row itself prioritises the most commonly used letters).
It’s a great way to learn, never overwhelming you with too much at once. Each exercise makes you practise your weakest key at the given moment. The system literally forces you to address your weaknesses. In my case, I spent an awful lot of time on r and s because it’s really hard to tell your finger that the s key has moved one place to the right of where you’ve been hitting it for the last thirty-years!
If I was a patient person, I would have worked my way through the alphabet on keybr.com and only moved on to the cold-turkey phase once I had an acceptable score for every key.
I am not a patient person.
Which is why, after just shy of eleven hours of practice spread over a bit more than a week, and after two thousand exercises typed, I went to the next phase.
I had done fifteen letters-worth of exercises. Not bad, not great. Here’s the thing though: of the eleven letters still to learn, six of them are in the same place as on a QWERTY keyboard. So I was ‘only’ adding five new letters, and they were all in the lesser used half of the alphabet.
Decision made, I switched over to COLEMAK on both my Macs, my iPad, and my phone. No going back.
Trying to type on a new keyboard layout is like having a broken brain. The nearest thing I can relate it to is going to work in a country where the language is one you don’t speak. You might have learnt a few words and phrases before leaving home, but once in the thick of it, surrounded by people you can’t understand and can’t communicate with, the enormity of the task ahead sinks in. You make an effort, stumbling along laughably slowly, and the second your mind wanders you find yourself nattering away in your native tongue. It’s hard.
Really hard.
To start with.
At first I felt like those two thousand exercises had been a total waste of time. Every word took as long to type as a sentence used to take. Forcing myself to not look at the keys (which would only be more confusing anyway, because the legends on the physical keycaps no longer relate to the letters they type), I struggled along, deliberately forcing each finger onto the required letter.
At the end of the first day I was mentally exhausted. My typing speed averaged 17 WPM, whereas in the exercises I was achieving well over twice that. It was frustrating, and worse, it was affecting my writing because 100% of my focus was on hitting the correct keys, leaving no mental capacity for the writing part of writing.
Temptation to throw in the towel was high. But I wasn’t about to throw away the time investment.
Day two was a little less tough. I found that the best way to type was with my eyes closed. Cutting down on one input to the brain made it easier to concentrate. After a while I was able to type some words without conscious effort. Although that sounds like progress, it introduces a new problem. When my fingers can make words appear on the screen apparently without input from my brain, my brain instantly disengages from the task and goes back to thinking about what those words should be. And the next thing I know, freed of mental oversight, my fingers revert to QWERTY and I’ve suddenly typed a line of gibberish. Frustration levels increase approximately five-fold!
I might have given up then, were it not for a secret weapon. I use a goal-tracking app on my phone, one of these things where each day you achieve something you set out to do, you check it off in the app and it makes a nice visual chain showing your streak of success. It’s basically a kid’s star-chart for adults. The theory is simple and sound; the longer your chain of achievement, the greater the pressure to not break it. It’s gamification of goals, and it works.
Now each morning my phone greets me with annoying red badges reminding me that I have unfinished business. If I slip up, if I give in and switch back to QWERTY, I cannot tick off the day’s achievement, the badge stays red, and the nice chain is broken.
It’s a slog, but I’m making progress. My chain is intact, and my typing speed is increasing noticeably. Every now and then I do a few practise tests on TypeRacer.com (another handy site) to check that this progress is real and not imagined (it is).
I have no idea if this is the optimal way to learn a new layout, but it’s definitely working for me.